First, forgive the sporadic posting lately, and the lack of pictures in this post. My Macbook crashed (I know.. I know.. they aren't supposed to do that!), and we're waiting till after Christmas to replace it. So, more regular posting should resume then, but for now, here's how we made salt dough ornaments yesterday!
I used my stand mixer to make these easier, but make sure to wash the bowl right away - salt dough is rough to get off once it dries, and it dries fast!
In the stand mixer, combine:
1/2 c table salt
1/2 c water
1 c all purpose flour
Let it mix until a sticky dough forms. I use floured wax paper on the counter, then knead the sticky dough for about 5 minutes - you will feel it become more elastic as you knead it.
At this point, I divided the dough into three pieces. Each of the kids had a piece of floured wax paper, some small cookie cutters, and a straw. They (quickly) rolled their dough - keep an eye on them to make sure they get it to between 1/2 and 1/4 of an inch. Then they cut the dough with their cutters. I put all the cut ornaments onto a cookie pan, and helped the kids use their straws to poke holes.
At this point, the dough goes into the oven on it's lowest temperature setting (mine goes to 200) overnight (or for at least 6-7 hours). Once the ornaments cool, they can be painted or drawn on. Use pretty ribbon or string in the holes to hang the ornaments onto the tree.
Monday, December 12, 2011
Saturday, December 10, 2011
New Living Translation Giveaway!
I got an email recently about a nice giveaway happening, so I thought I'd share the details with you!
The email said:
Starting on November 29th until December 24th at the New Living Translation Facebook page we're giving away lots of great prizes and something free for you just for singing up.
By visiting the giveaway entry page (located on the NLT Facebook page, the link is under the profile picture) and entering your name and e-mail address you'll be entered to win the following prizes:
I just "liked" their facebook page and entered my information, so I got my download copy of the Book of Luke by the Life Application Bible Study - looking forward to checking it out!
The email said:
Starting on November 29th until December 24th at the New Living Translation Facebook page we're giving away lots of great prizes and something free for you just for singing up.
By visiting the giveaway entry page (located on the NLT Facebook page, the link is under the profile picture) and entering your name and e-mail address you'll be entered to win the following prizes:
- One random person each day will win a Life Application Study Bible Family Pack (Guys Life Application Study Bible hc, Girls Life Application Study Bible hc, Student's Life Application Study Bible hc, Life Application Study Bible hc, Life Application Study Bible Large Print hc).
- One Random person each week will win an Apple iPad 2!
I just "liked" their facebook page and entered my information, so I got my download copy of the Book of Luke by the Life Application Bible Study - looking forward to checking it out!
Tuesday, December 6, 2011
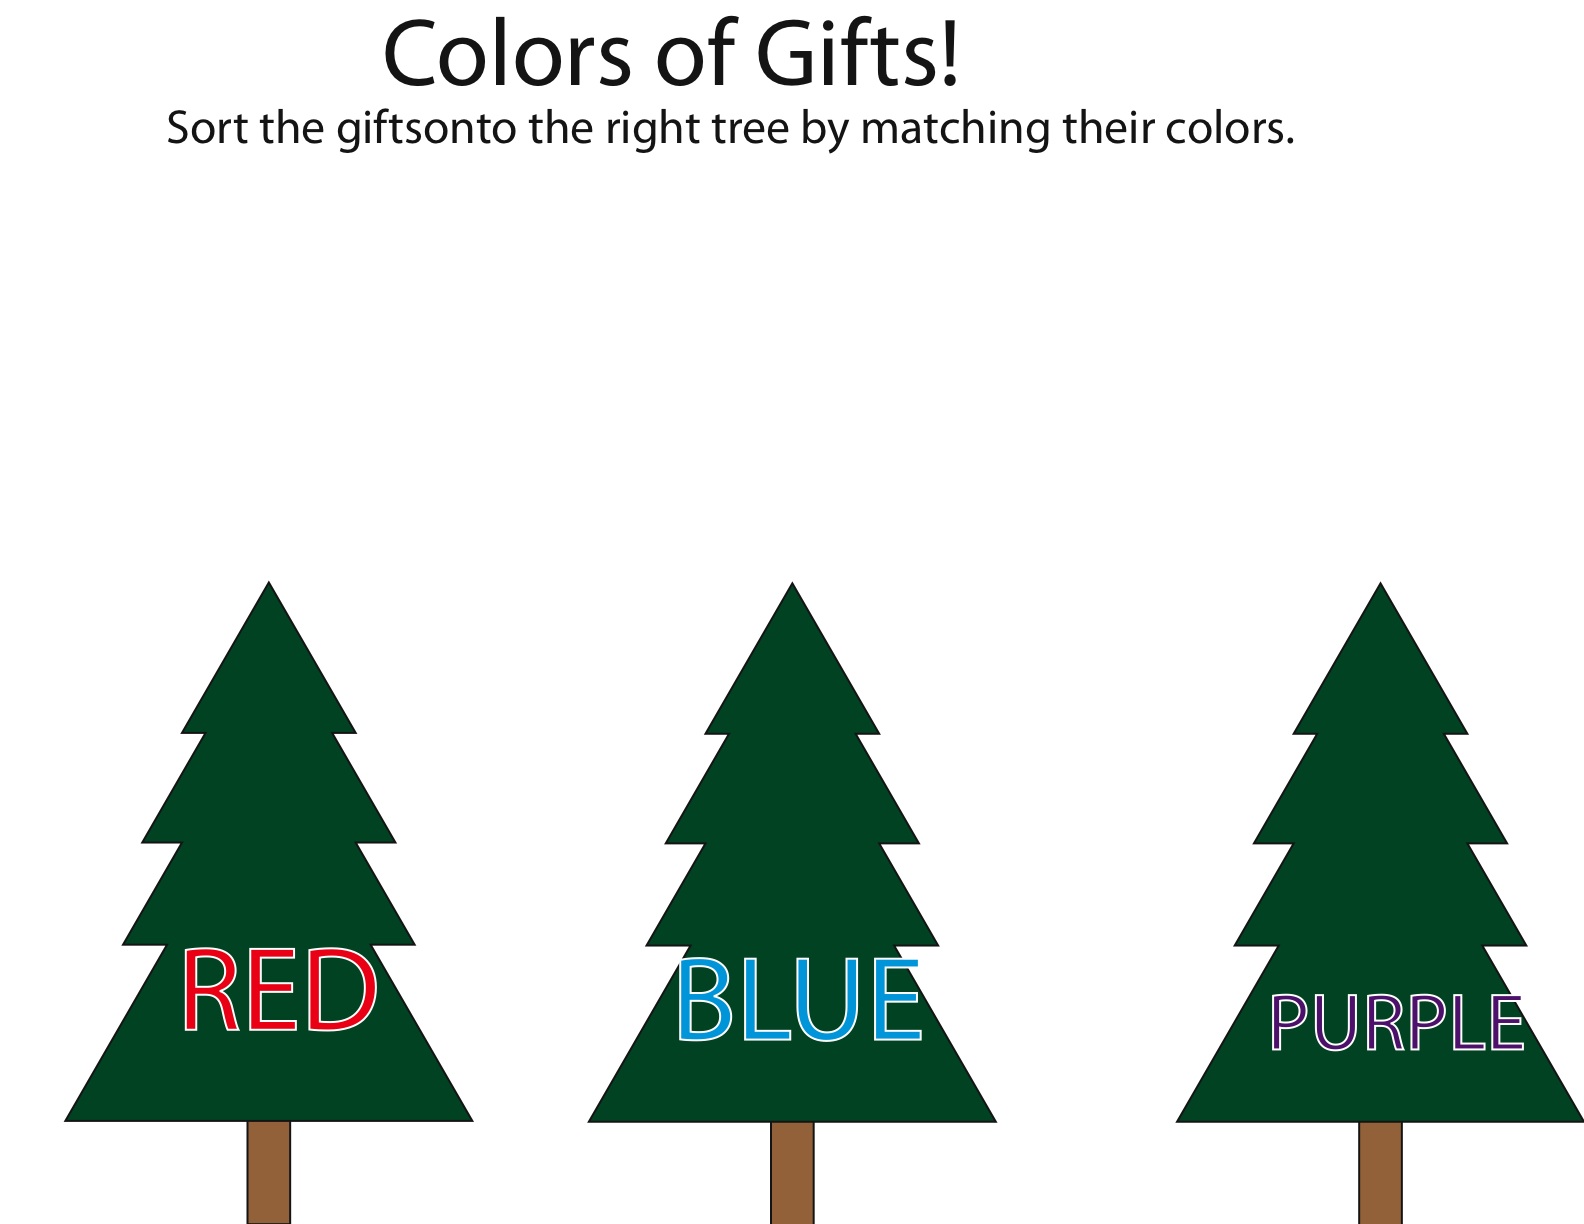
Christmas vowel sound sorting
Have I mentioned that I love Christmas? Here's yet another Christmas-themed educational activity that was super-easy and a ton of fun for the kids.
Here's what I put on one of our trays this morning.

Each of the trees has a vowel on the top "a" through "u", and the stocking is full of phonics objects that I ordered from Montessori Services.
 I made sure that each of the objects was a one syllable, short word with an easily identifiable middle vowel sound (ie, "jet", "tag", "nut", "pad", "bag", etc.).
 The kid's goal was to sort each of the gifts under the correct tree according to the middle vowel sound. So, "pad", "car", "tag", "bag" went under the "a" tree, "jet" went under the "e" tree, "lid" went under the "i" tree, "dog" and "pot" went under the "o", and "nut", "cup" and "mug" went under the "u" tree..

Here's what I put on one of our trays this morning.

Each of the trees has a vowel on the top "a" through "u", and the stocking is full of phonics objects that I ordered from Montessori Services.


Book Review: A Year With Jesus, Daily Reflections and Readings on Jesus' Own Words
I recently received a copy of A Year With Jesus, Daily Reflections and Readings on Jesus' Own Words by P.R. Nettlehorst for the purposes of review.

Summary:
A Year with Jesus is a series of daily Bible readings and reflections on the readings, which provides a short, elegant, and inspiring pick-me-up to anyone's day. This book is divided into10 sections, covering everything from "love and hate" through "truth and lies, and"each section containing readings and reflections on that specific topic. This topics are relevant to modern life today and provide an accessible way to access Biblical readings and reflections on situations in the reader's life. This book makes the Bible accessible to the busy person (like a busy parent!) through short readings that focus on the words of Jesus as relevant to a specific topic, and reflections that highlight and emphasize the words of Christ.
Review:
I know in my own life, it's very easy to get too busy and distracted by the kids, dinner, activities, schoolwork, cleaning, etc. and fail to take time for myself. I think that A Year With Jesus will be the way I start taking five minutes a day to recharge and make sure I get the time I need for me. The readings and reflections are very short (about one page each) and only take a few minutes to complete. This makes doing the reflection and readings every day achievable in my life without taking time that I don't have.
I read this book cover-to-cover in a few days, for the purposes of a review, but I have also taken a week to do the readings and reflections once a day as they are intended. It's certainly a book that provides a great deal of reflection and meditation when taken slowly. Although the reading and reflection take as little as five minutes a day, the material and ideas presented have stuck with me all day. I find myself, while cleaning the bathroom or doing the dishes, reflecting on some idea of other presented in the readings.
Even if you're not the type of person to usually read for your own pleasure, or to take time for biblical readings and meditations every day, I encourage you to check this book out. It's a pleasure to read, is full of ideas and thoughts to meditate on, and is a wonderful way to take a few minutes a day to recharge.
I was provided with a copy of this book for review. No other compensation was given, and all opinions are those of the author.
Friday, December 2, 2011
Crafty stocking stuffer: travel-sized memory game!
This was so easy that a tutorial for it seems silly, but it was a lot of fun, very cheap, and my kids are going to love this travel-sized memory game!

I made this with all stuff I had around the house, and even if you don't have some of the supplies, it's nothing expensive. I used little 1" square wooden tiles that I picked up at the craft store a while ago (I paid a few bucks for a bag of 100), a tiny bit of milk paint to paint the back (I love milk paint, because it's nontoxic and very eco-friendly, and will NEVER chip. You can use any type of paint you want, but you might have to use a sealer on top), a pad of scrapbooking paper, a foam brush and modge podge (I made my own modge podge mixture with a 50-50 mix of Elmer's Glue-All -NOT school glue- and water).

Paint the backs of all the tiles in the same color. I used this slate-blue shade of milk paint.. as you can see, milk paint absorbs into the wood, so it doesn't have that same "perfect" look and finish as other paints. But it's easy to use, and doesn't chip - just don't get it onto your table or counters, because it's nearly impossible to remove!

While the paint dries, cut enough squares of scrapbooking paper for all your tiles. I used 16 tiles, so I cut 8 matching pairs of scrapbooking paper to give me 16 total squares. I used shades that were very similar in color and in style, to require increased visual discrimination. If you're working with a younger kid, or one who is easily frustrated, pick very different colors and patterns for your pairs.

Now for the fun part.... modge podge all the little squares of paper onto the "right" (unpainted) side of the wooden tiles. The trick with modge podge, especially homemade modge podge, is to use VERY thin layers. Wait for each layer to dry, then do another layer on top. I did about 5 very thin layers, letting the whole surface dry between layers.
Once the final layer of modge podge is dry, you're done. See, it's so super easy, but it's very cute, totally portable, and so cheap it doesn't matter if one gets lost somewhere.

Thursday, December 1, 2011
Christmas learning toy ideas (and assorted other random thoughts)
There are at least 10 posts I want to write today, but there's no way I have time for it... so, before I get to today's post, I'm going to touch on the other topics in my head, and I promise they will each get full posts later in the week.
First, RaisingGeniusFish has been honored with two awards this week - and, I promise, each will get their own post this week, but for now I wanted to acknowledge them and say thanks.
One award we were given was the Liebster Blog award, from Lori at Reading Confetti. The Liebster award highlights new blogs, and we are so honored! I recommend that you all check out Lori's great stuff at Reading Confetti - I love these easy luminaries, part of her 12 days of Christmas series.
The other award we were given was The Versatile Blogger award, from Sierra at H if for Homeschooling. This is also an award that highlight new bloggers, and we are so honored! H is for Homeschool features cute ideas, especially good for tot-aged. I loved these fall-themed tot trays for Bigger Bit!
Second, I just wanted to throw out that we did make our salt dough ornaments today! We're painting them in about a week (as per the plan), and I will post about them then, but for now, at least, we're on track.
Third, I got an order I placed at Montessori Services today for language objects, and they are awesome! If you've been in the market for miniatures to use as language objects, either for teaching letter sounds or to use for spelling, be sure to check these out.
I promise, all these points will be developed into full blog posts within the next week or so. But for now, on to today's post!
Today, I wanted to share a quick list of toys/games that we either have or wants, as potential Christmas ideas. We try to incorporate learning/creativity/education into most aspects of our lives, so for Christmas and birthdays, my kids get toys that are so much fun they don't know they are learning! None of these are affiliate links, just ideas. Check them out, compare prices, use the ideas or don't.. I just wanted to give a starting point of educational gifts for tots and preschoolers for people who might not know quite where to begin this year (or for next year).
- Unit blocks.
~ We have two of these little sets by Melissa & Doug, but there are sets with bigger blocks (better for little kids or those who are still likely to chew things!). Unit blocks are great for encouraging creativity and imaginative play!
- Pattern blocks and patterns.
~ We have this set by Melissa & Doug, and we love it. I've used other pattern blocks sets and they have all been wonderful. These can last as an educational toy for a long time - kids can start with simple patterns with the colors shown to allow easy matching of the blocks, and then move on to patterns in black and white that require more abstract problem solving to figure out how to finish. You can find pattern books and printables all over the internet, which makes it easy to change things up and keep the patterns fresh!
- Shape sorting and sequencing. There are dozens of varieties of boards where you sort the objects by shape, color, and size.
~ Bigger Bit is getting this set by Melissa & Doug for Christmas, because I got a great deal on it.
~ I like the look of this gradient sorting set by Guidecraft, too! There are a ton of different shape/size/color sorting board available, so hunt around and see which one will work for your kids best - these come at a variety of skill levels, which makes it easy to find one that will work well for your child.
- Letter identification games.
~ We have this set by Plan, and, while we don't use it every day, it's wonderful as a rainy afternoon activity.
~ I've been eyeing this magnetic A to Z set by Klutz toys, and this cute alphabet puzzle card set by Melissa & Doug, too. These are just a fun way to reinforce letter sounds, without it seeming like "school work".
- Memory games. We love to play memory! Even Bigger Bit, at 2, is starting to get in on the fun.
~ We have this wooden animal memory by Plan , and love it.
~ In fact, they like it so much we're getting this memory match game by KidO as a family gift this Christmas.
- Unusual puzzles. We already have quite a collection of puzzles, from the large knob type through jigsaw puzzles, but since they are generally inexpensive, fun, and educational, I'm always on the lookout for more. We have some unusual but educational puzzles on our "possible" list this year.
~ The a-z magnatab and 0-9 magnatab, both reinforce writing skills with a fun magnetic stylus (the princess will love these!)
~ The a-z magnatab and 0-9 magnatab, both reinforce writing skills with a fun magnetic stylus (the princess will love these!)
~ The fraction board puzzle by Guidecraft looks like a neat way to teach about whole, half, third
~ This Twist n Match by Plan, I think Bigger Bit would enjoy because she loves matching shapes, and this is an unusual and kind of challenging shape matching puzzle!
~ This Twist n Match by Plan, I think Bigger Bit would enjoy because she loves matching shapes, and this is an unusual and kind of challenging shape matching puzzle!
- Fine motor skills toys.
~ This beehives toy by Plan is nearly certainly going to be under our tree this year! Using those pinchers to grab the little bees and get them into the correct beehive is a fine motor skills challenge with an added color matching bonus. Plus, Bub LOVES bugs - even with three sisters, he is ALL boy!
~ Bead stringing sets are always in demand in our house, and I love this farm bead stringing set by Alex Toys. I think my kids would like to play with the little animals while stringing the beads.
~ While cutting fruit is a good way to practice fine motor skills, and practical life skills, I don't necessarily trust my kids with a knife! I think that this cutting set by Melissa & Doug would be a cute addition to our play kitchen!
Wednesday, November 30, 2011
Advent calendar
I spent the better part of today setting up our Advent Calendar!

This was really, really easy. I cut Christmas Trees out of card stock, then cut tiny tags to put the numbers on.

I wrote the activity for the day on the back of the tree, then used a small piece of pipe-cleaner to hook the number tag to the tree. (The reason for not putting the numbers right on the tree is simple.... by putting the numbers on a separate tag, I can exchange the activities for day number 4 and day number 9, for example.. by being able to move the numbers, I can change the schedule to fit our plans for the month as they develop!)

I ran a piece of silver ribbon through the pipe cleaner on each tree, to hang them. Super cute and easy.
1 Make salt dough ornaments
2 Coloring page
3 A Christmas Carol movie
4 Candle craft
5 Make chocolate chip cookies
6 St. Nicholas Day celebration!
7 Rudolph the Red-Nosed Reindeer movie
8 make a Christmas tree snack
9 Paint salt dough ornaments
10 in search of santa
11 coloring page
12 Make spiced apple cider
13 the story of Christmas
14 Go for a walk and see the Christmas lights!
15 the Happy Elf movie
16 Make sugar cookies
17 Decorate sugar cookies
18 The 12 Dogs of Christmas movie
19 coloring page
20 Christmas tree button crafts
21 Graham Cracker Gingerbread houses
22 make chocolate spoons
23 make Christmas creamer for Christmas morning coffee tray
24 Christmas cake for baby Jesus
Tuesday, November 29, 2011
Feelin' Crafty: Applesauce cinnamon ornaments!
My house smells like Christmas now! The cinnamon scent is wonderful this time of year, and the kids had a ton of fun making these small ornaments. :-)

We used a 1 to 1 ratio of plain, unsweetened ("natural style") applesauce and cinnamon (I used 1 1/2 cups of each, but any amount will be fine as long as it's a 1 to 1 ratio).


These are so easy to make and, while I wouldn't eat them (probably wouldn't taste good), they are made with totally harmless ingredients! I love that!
We used a 1 to 1 ratio of plain, unsweetened ("natural style") applesauce and cinnamon (I used 1 1/2 cups of each, but any amount will be fine as long as it's a 1 to 1 ratio).
It makes a "dough" pretty easily, I just blended with a spoon (just to note, wash the bowl and spoon fairly quickly afterwards!).
I let the kids flatten their section of dough with their hands, then they tried the rolling pin to make it flat. They used our plain metal Christmas cookie cutters to cut out the ornaments.

They'll take a while to dry. From how mine are going, I'm guessing 4+ days - but it's super humid here, so maybe yours will be faster. Make sure to poke a hole for thread/ribbon if you're going to use them as ornaments. After I took this picture, I ended up taking sticks from the yard, breaking them into small pieces, and using them to keep the holes open while they are drying - much, much easier than re-poking the holes every hour for the next 4 days.
Monday, November 28, 2011
Christmas word matching
This is a super-cute and really easy Christmas word matching activity that we have out this week! Princess is mostly using it, but Bub is liking it too.


The objects are just random Christmas decorations that we had around the house - they'd also be easy to find at the dollar store or WalMart. I picked objects that were mostly 3-4 letter words that were somewhat easy to sound out.

We used "star", "drum", "tree", "sled", "dog", "card", and "bulb". I wrote out the name for each object on a small piece of cardstock.

The kids pick an object, then match the word to the object. My kids love when we introduce seasonal themes into our homeschooling, so Christmas-themed games are always a hit.

Sunday, November 27, 2011
Christmas printable set
I love Christmas, so this printable set is particularly exciting to me!
To skip the breakdown and go right to the download, just scroll to the bottom! :-)


Christmas Printable Set1
To skip the breakdown and go right to the download, just scroll to the bottom! :-)

Copying patters (pages 2-4)

Ordering trees by size (page 5)

Completing patterns (pages 6-7)

Push pin star work (page 8)

Cutting strips (page 9)

ordering letters (page 10)

addition activity (pages 11-12)

line tracing (pages 13-14)

numerals and counters (pages 15-17)

sorting by color (pages 18-21)
Christmas Printable Set1
Saturday, November 26, 2011
Feelin' Crafty: Christmas ornament re-do!
Today, the kids took ornaments we had from a few years ago, and made them into kid-masterpieces for our tree.

These are the ornaments we started with. I picked them up at Ikea a few years ago, and I love them! They were perfect with our sleek, modern, white-and-gold tree. But, now the kids are old enough to want to help with the tree... so, this year, the tree is multicolored, bright, and traditional. I was not willing to sacrifice these ornaments, though, so I had the kids re-make them into wonderful, colorful, and bright works of art.

Here's what we started with: heart ornaments, markers, glue stick, and a cup of sequins.

Color first!


Here they are on the tree, aren't they cute?

Good deal on Tiny Print's Holiday Cards
Yesterday I shared our Christmas photo secret, plus my top picks for holiday cards this year! Today, I just wanted to show you a deal that Tiny Prints posted on their blog this week, that makes for a pretty good deal on your holiday cards! Buy a $25 gift certificate and $100 worth of Holiday cards, and you'll save $30 with the code 30OFFHOLGCERT at checkout! Since this code was only posted on their blog, not on their main website, many people probably won't know about it. It's only good through 11/27, though, so you should act on it now! See the Tiny Prints blog for all terms and conditions here.
Friday, November 25, 2011
Christmas Cards!
With Thanksgiving over and Black Friday quickly drawing to a close, I'm starting to work through Christmas.
While other people start with lists of gifts to buy, or holiday decoration plans, the first decision I always make is our Christmas cards. Because we have family who live far away and we don't see often, our holiday cards are an important way to share our year with family.
My first choice for photo cards in recent years has been Tiny Prints. From birth announcements through invitations, Tiny Prints truly seems to have a card for most occasions! Their quality and customer service have been wonderful for us. In fact, we're so pleased with Tiny Prints that they have agreed to give our family 50 holiday cards just for sharing our Christmas card plans with you all!
I've spent a few hours reviewing the holiday cards available on Tiny Prints this year, and I've narrowed my options to two! Since I'm having a hard time deciding, I thought I'd share both with you.
The first option is the Fun Fair Isle: Bright Green. This is a cute card, I love the colors, and the inside spins, so you can double the amount of pictures!

The second option we're looking at this year is the Berry Wonderful: Cranberry tri-fold card. This is also bright, fun color and holds 10 pictures!

Our Christmas card sending secret... we don't take christmas pictures to use in our cards! Every year, I intend to.. and we never get around to it before it's time to order cards. So, instead, I take my favorite pictures of the kids, both together and separate, through the year, convert them all to black and white in photoshop, and use those on our cards! With a bright card, black and white pictures look super-cute, and they save the problem of "this picture doesn't match that picture".
Check out all of Tiny Print's cards here. What's your favorite?
Wednesday, November 23, 2011
Homemade cranberry sauce

The Princess was our cranberry sauce maker this year. Homemade cranberry sauce is a Thanksgiving tradition around here, and The Princess did a great job making it (with two adults standing with her to help/supervise)!
Start with a big pot, 2 cups of water, white granulated sugar, and 24 oz fresh cranberries.

Add the two cups of water to the big pot.

Then add about 1 1/2 c of sugar to the water. (Note that this will make a less sweet, more tart sauce. If you like your cranberry sauce more sweet, up the sugar to 1 3/4 to 2 1/4 cups.)

Mix the sugar into the water.

Heat till boiling (carefully!).

Add the cranberries to the boiling sugar water (carefully!).

Keep the burner on high, and let the water come back to boiling. The skins of the cranberry sauce will start to split (sometimes it makes a fun popping noise). Stir occasionally.

It's done when all the cranberries are soft, with split skin.

An adult should pour the sauce into whatever container you want to cool it in.
Fresh cranberry sauce. Done.
Subscribe to:
Posts (Atom)